How to Troubleshoot Webcam Issues on a Laptop: 8 Steps: Webcams, which are built into laptops from the factory, are mostly used for video calling, participating in webinars, and scanning bar codes. You could experience certain problems with the built-in webcam; in such case, you can attach an external webcam or try to remedy the issue with the built-in webcam; this article will enable you to resolve the webcam-related problems.
Typical Webcam Issues
The following are the issues that the majority of users experience:
- The laptop’s camera is showing a black screen or a blank webcam
- No audio when the webcam is turned on
- The laptop cannot detect the webcam
- The laptop camera is glitchy
Why is the webcam not working correctly? – How to Troubleshoot Webcam Issues on a Laptop
Your Webcam may not be functioning for a variety of reasons, including:
- Incompatible or outdated drivers
- Webcam is disabled
- Camera permissions
- Hardware issues
- Antivirus permissions
How can you fix webcam problems?
If your webcam isn’t working properly, you can attempt the following workarounds on Windows laptops, which allow you to address the issues you have while using it:
- Reset the camera settings
- Re-enable the device from the device manager
- Update the webcam driver
- Re-install the driver
- Roll back driver
- Update Windows
- Check Camera privacy settings
- Check your antivirus settings
Reset the Camera Settings
Try resetting the settings by following these instructions if the webcam isn’t functioning properly:
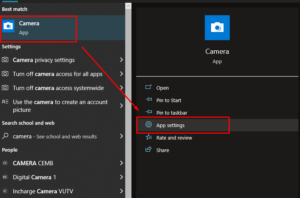
FIRST STEP: In the search box, type “camera,” then click “App settings.”
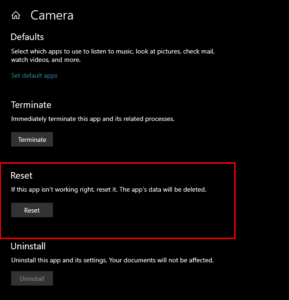
SECOND STEP: Scroll down to Reset option and click on the Reset button:
Re-enable the Device from Device Manager
Because hardware problems are uncommon when a webcam isn’t functioning properly, it’s usually the device’s driver that has to be updated. Take the following actions to re-enable the webcam driver:
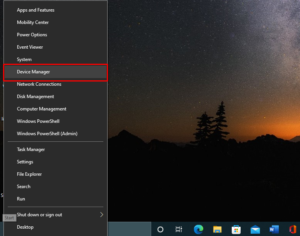
FIRST STEP: Press Windows + X and click on the Device Manager from the pop-up menu:
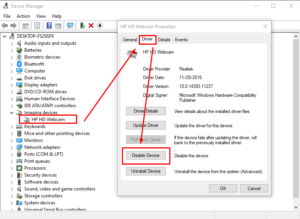
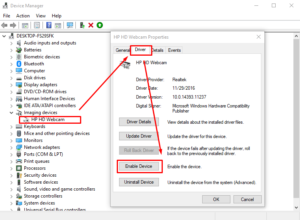
SECOND STEP: Click on Imaging devices or Camera as the option varies from system to system then go to the properties of Webcam, and after that click on Disable Device to disable it:
THIRD STEP: Go back to the webcam’s properties and, re-enable it, click Enable Driver:
Update Webcam Driver
Webcam problems can also result from obsolete webcam drivers:
FIRST STEP: Right-click on the Start icon and from there click on the Device Manager:
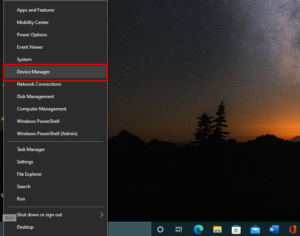
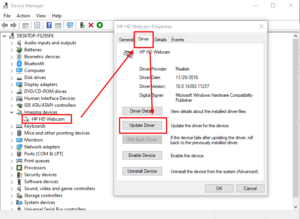
SECOND STEP: Following that, choose the camera or imaging devices, right-click the webcam, and then select Properties. From there, choose Update driver:
Reinstall the Driver
The other solution to fix your webcam if you have updated the driver but it is still not functioning properly is to reinstall the driver:
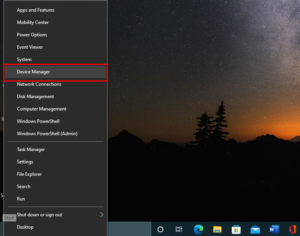
FIRST STEP: Launch the Device Manager on your device by pressing Windows + X key from the keyboard:
SECOND STEP: After that, select the camera or imaging devices, right-click the webcam, choose Properties, then select the driver, and finally select the option to uninstall the device:
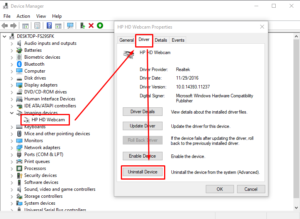
The webcam driver will automatically instal if you restart your device or reinstall the driver from the official website.
Roll Back the Driver
If after updating your driver the problem persists or gets worse, you can simply revert the driver to the prior version:
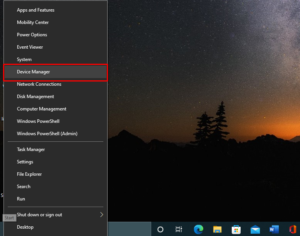
STEP ONE: After pressing Windows + X, select Device Manager by clicking:
SECOND STEP: To pick the Rollback Driver option, right-click the webcam, double-click the camera or imaging devices, and then select properties.

Update Windows
The webcam may freeze because of an outdated version of Windows; an update fixes bugs and eliminates viruses from the system. Check for the most recent Windows update:
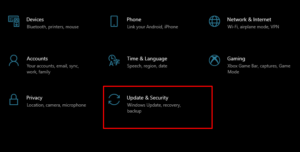
FIRST STEP: Press Windows + I to open Settings of your laptop and select Update & Security
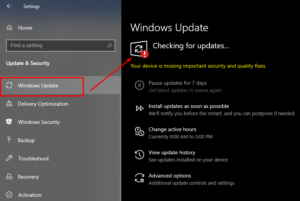
SECOND STEP: To find the most recent update options, select Windows Update:
Check Camera Privacy Settings
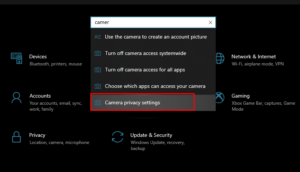
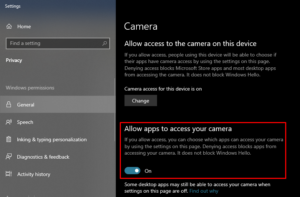
There may be a problem with the camera privacy settings if you activate the camera on your laptop and it displays a dark screen. You can modify the webcam settings on a Windows laptop by disabling the usage of the camera by various applications. To do this, check the settings and then follow these steps:
FIRST STEP: Open Settings, enter “Camera,” then click “Camera privacy”:
SECOND STEP: Activate the switch to permit apps to access the camera:
Check Your Antivirus Settings
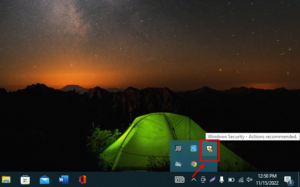
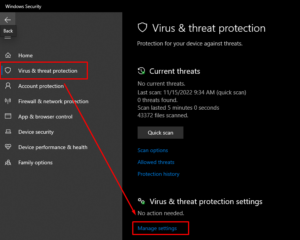
The steps listed below can be used to reactivate the webcam after the laptop’s default antivirus has interfered with its settings and disabled it:
FIRST STEP: Click on the Windows taskbar tray and form there click on the Windows defender shield icon:
SECOND STEP: Next, select Manage options from the Virus & threat protection menu.
THIRD STEP: Turn the toggle off for Real-time protection and re-access the camera:

CONCLUSION
Default laptop cameras may experience certain problems over time. These problems could be caused by damaged drivers, privacy concerns, or an anti-virus that is interfering with the webcam’s correct operation. There’s no need to swap out the webcam or add an additional webcam to fix these problems. To repair the problems, implement the above fixes.

