
How to Take Screenshot on an HP Laptop: 5 Ways: Instead of snapping a photo of your laptop screen from your smartphone, you can take screenshots to save your work or to keep track of your decisions before submitting it online. As you may share screenshots of the solutions you find online, you can utilise screenshots to assist others who are trying to solve a particular problem. There are numerous ways to capture a screen shot of your laptop’s display, but we’ve included the five simplest methods below for an HP laptop.
Taking screenshots is a quick way to save your work, as was already discussed, and you can also use screenshots to assist your friends in solving problems. If you are unable to provide the students in your class a live example of any process, you can still instruct them using screenshots. Here are the five simplest methods for taking screenshots on an HP laptop.
- Press Windows key + W key
- Press Windows key + PrtScn key
- Press SHIFT key + Windows key + S key
- Press Windows key + G key
- Use the built-in snipping tool
Taking Screenshot by Pressing Windows key + W key -How to Take Screenshot on an HP Laptop
This shortcut key is the ideal for you if you need to take a screenshot of your laptop’s screen because it captures the entire screen of your HP laptop and gives you the tools you need if you only want to save a portion of it. After that, you can store your screenshot wherever you’d like. When you simultaneously hit the Windows key and the W key, a pop-up will appear at the bottom of your screen, as shown in the illustration below:

Clicking on the “full screen snip” will capture a picture of your entire screen and launch an editor where you may change it as shown in the screenshot below:
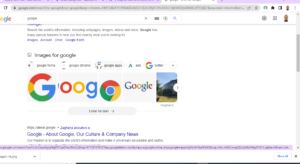
If you don’t require a snapshot of the entire screen, you can crop the image or add different coloured highlighters or markings to your screenshot.
When you’re finished customising it, you can copy, save, or share the screenshot with another person.
Taking Screenshot by Pressing Windows key + PrtScn key – How to Take Screenshot on an HP Laptop
This could be a simple and quick technique to take a screenshot on your HP laptop if you need to capture the entire screen. Simply simultaneously hit the Window key and the PrtScn (print screen) key, and your screenshot will be taken as soon as your window’s brightness dims for a moment.
Next you can see your screenshots in the folder named screenshots in the pictures folder of your PC.
Taking Screenshot by Pressing SHIFT key + Windows key + S key
This method might interest you if you wish to merely save a portion of your laptop screen. This brief collection of keys, as opposed to the first method we described, makes it simpler for you to snap a screenshot of a specific area of your HP laptop.
Simply press the SHIFT key, Window key, and S key simultaneously to take a screenshot. When you do so, a little bar with a few options will display at the top of your laptop’s screen as seen in the illustration below:
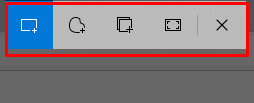
From there, you can capture a screenshot of the entire screen or any selected region of your screen, whether it be in square or round form.
The screenshot will only be copied to your computer’s clipboard once you take it, where you can paste it or share it to others through email.
Additionally, pressing the Window key and the S key yields the same set of options as clicking on the pop-up.
Taking Screenshot by Pressing Windows key + G key – How to Take Screenshot on an HP Laptop
By pressing the Window key and the G key simultaneously on your HP laptop, you may also open the choices for creating a live stream. You can take a screenshot of your screen by selecting the camera symbol from the capture menu, which is located in the top left corner of your screen.
The intriguing aspect of this method is that it saves the screenshot together with the name of the website or programme you are screenshotting so that you can recall about what it is that you are taking a screenshot.
There are two ways to access the saved screenshot: first, from the gallery menu, select open file location.
This technique is most suited for live stream gamers since they may use it to capture some of the best moments they had while playing games or to snap photos of the leaderboard in the game.
Taking Screenshot by Using the built-in snipping tool – How to Take Screenshot on an HP Laptop
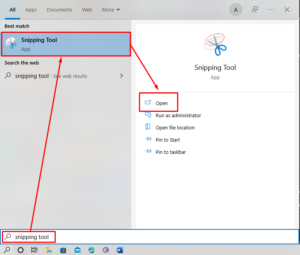
Last but not least, you can use the snipping tool to alter your screenshot after taking one of any selected part or the complete screen. This tool is already included with the Windows operating system and doesn’t need to be installed in order to utilise it. You must type the following in the Windows search box to access the snipping tool:
The interface of the snipping tool looks like the one in the following image once it has been opened:
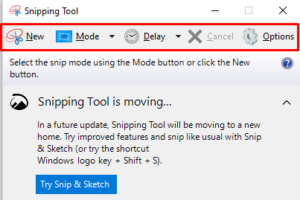
You must click the “new” symbol in the snipping tool’s top menu bar to select the region you want to capture on camera. When the programme prompts you to save the screenshot after you’ve taken it, do it in the location of your choice.
CONCLUSION
The easiest way to explain any procedure for which you cannot provide a live example is through screenshots. It can assist you in saving the steps of any process in case you miss one. Similar to how you can quickly save your work before sharing it to someone, utilising screenshots can help. There are many tools available online that allow you to take screenshots, but it might be challenging to discover the best ones. Therefore, we’ve listed the five quickest and most straightforward ways to take screenshots, none of which call for the installation of outside software.